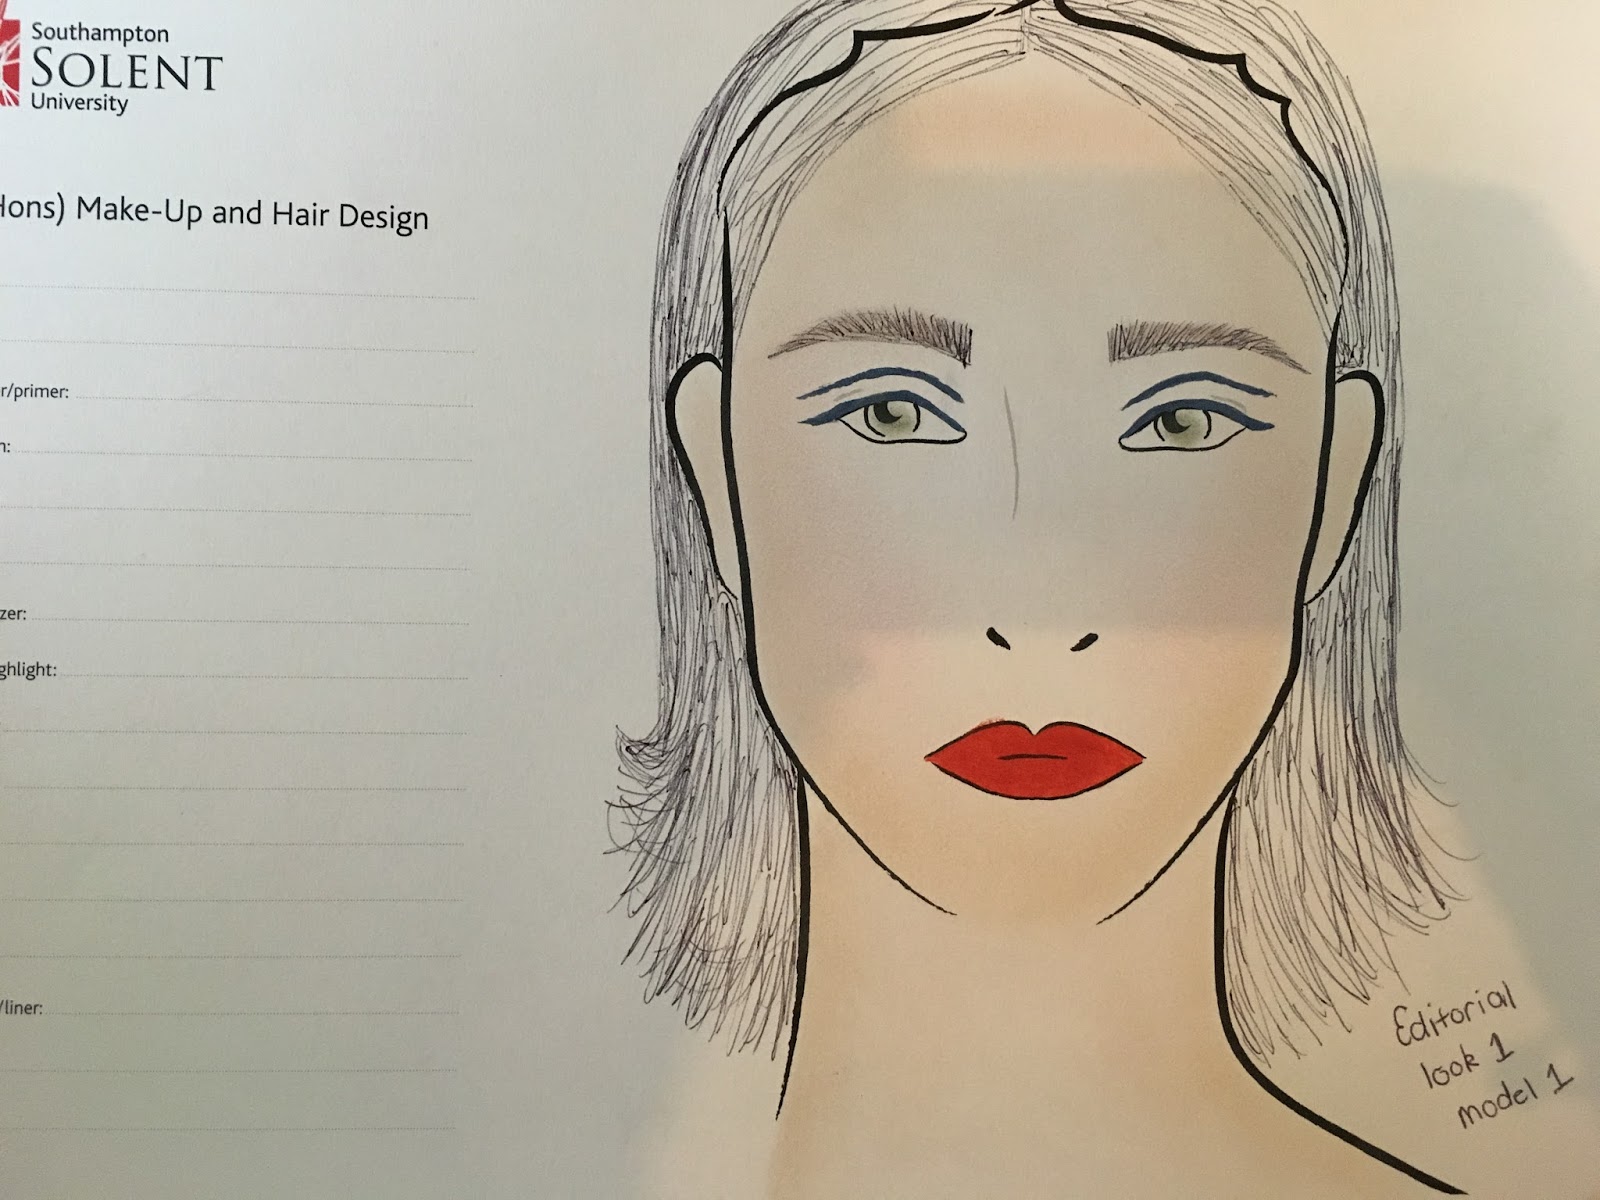
Makeup chart One


Makeup chart Two

Hair Design

Garments Look One


Garment Look two


MAKE-UP
- Garnier moisturiser
- Laura Mercier primer
- Maybelline foundation 60
- Revlon foundation 160 buff
- Kryolan make-up blend
- collection brightening under eye concealer
- derma colour fixing powder
- Ben Nye banana powder
- Illamasqua duo blush
- Illamaqua sculpting powder duo
- Revolution Radiant light highlighter
- Rimmel 3D mascara black
- Anastasia Beverly Hills Dip brow pomade medium brown
- collection blue liquid eye liner
- rimmel red diva lip liner
- Natura faces Batom fps lipstick
Steps
- First step was cleaning the face with toning water just to make sure the model face is make-up free. I then used a moisturiser all over the face and the neck. I then applied a primer to the face all over with my foundation brush, the skin is now ready for the application of make-up.
- I then applied the Amarni foundation all over the face for a light coverage. I used a darker shade of foundation and a lighter one to contour the face. This is to be able to give a light contour and sculpting of the face with the foundation. I applied the dark on the top of the forehead, cheekbones, chin, just under the jaw line and tip of the nose and side, I then applied the light on the centre of the forehead, under the eyes, below the cheekbones, centre of chin, eyelids and centre of the nose. I then placed a small amount of the make-up blend and squeezed brush, this helps to blend the foundation into each other and give a slight glow to the skin. Using the brush I blended it all in and worked it onto the ears and down the neck.
- Next was setting the foundation and highlighting certain areas with the powder. I applied the white powder first under the eyes, centre of the forehead and under the cheekbones and the over I applied the banana powder. I then used my large powder brush to blend it in. I wanted a glowy look so I applied only a small of powder so it set the make-up however wasn't completely matte.
- I then used the sculpting powder and used my brush to define the cheekbones. I then went over the cheeks with the Illamasqua blusher which is a mix of a dark pink and bright pink to give warmth to the skin. Lastly on the skin was highlighting it which I used a fan brush and highlighted the center of the forehead, under brow, tops of cheekbones, down nose, cupids bows and chin.
- I then started on the eyes where I created a blue winged eyeliner and created a flick, I then drew another line with the blue liner in the crease of the eye and elongating out I then gave the lashes one coat of black mascara.
- Next was the brows which I filled in a defined with a brown pomade and brush.
- I then lined the lips with a red liner and filled them in with an ornage lipstick and used my brush to blend the colours in.
HAIR
Equipment:
- Paddle brush
- pin tail comb
- straighteners
- hair spray
Steps
- Firstly I started with brushing the hair through. I then used the comb to create a middle parting.
- I then pre heated the straighteners and completely straightened the hair.
- I then back combed the top and sleeked it down and sprayed the hair in place.
LOOK 2
MAKE-UP
- Garnier moisturiser
- Laura Mercier primer
- Maybelline foundation 60
- Revlon foundation 160 buff
- Kryolan make-up blend
- collection brightening under eye concealer
- derma colour fixing powder
- Ben Nye banana powder
- Illamasqua duo blush
- Illamaqua sculpting powder duo
- Revolution Radiant light highlighter
- Rimmel 3D mascara black
- Anastasia Beverly Hills Dip brow pomade medium brown
- collection black liquid eye liner
- rimmel red diva lip liner
- kroylan lip kit berry
Steps
- First step was cleaning the face with toning water just to make sure the model face is make-up free. I then used a moisturiser all over the face and the neck. I then applied a primer to the face all over with my foundation brush, the skin is now ready for the application of make-up.
- I then applied the Amarni foundation all over the face for a light coverage. I used a darker shade of foundation and a lighter one to contour the face. This is to be able to give a light contour and sculpting of the face with the foundation. I applied the dark on the top of the forehead, cheekbones, chin, just under the jaw line and tip of the nose and side, I then applied the light on the centre of the forehead, under the eyes, below the cheekbones, centre of chin, eyelids and centre of the nose. I then placed a small amount of the make-up blend and squeezed brush, this helps to blend the foundation into each other and give a slight glow to the skin. Using the brush I blended it all in and worked it onto the ears and down the neck.
- Next was setting the foundation and highlighting certain areas with the powder. I applied the white powder first under the eyes, centre of the forehead and under the cheekbones and the over I applied the banana powder. I then used my large powder brush to blend it in. I wanted a glowy look so I applied only a small of powder so it set the make-up however wasn't completely matte.
- I then used the sculpting powder and used my brush to define the cheekbones. I then went over the cheeks with the Illamasqua blusher which is a mix of a dark pink and bright pink to give warmth to the skin. Lastly on the skin was highlighting it which I used a fan brush and highlighted the center of the forehead, under brow, tops of cheekbones, down nose, cupids bows and chin.
- I then started on the eyes where I created a black winged eyeliner and created a flick, I then drew another line with the blue liner in the crease of the eye and elongating out I then gave the lashes one coat of black mascara.
- Next was the brows which I filled in a defined with a brown pomade and brush.
- I then lined the lips with a red liner and filled them in with a dark berry pink lipstick and used my brush to blend the colours in.
HAIR
Equipment:
- Paddle brush
- pin tail comb
- straighteners
- hair spray
Steps
- Firstly I started with brushing the hair through. I then used the comb to create a middle parting.
- I then pre heated the straighteners and completely straightened the hair.
- I then back combed the top and sleeked it down and sprayed the hair in place.
Some Images from the Shoot


Mood boards


How the shoot went-
I had a very small time frame to shoot the look in because one of the models had work before so couldn't shoot any earlier and had an appointment after so had to leave so I was given real task. My first model came to my house at 12.30pm and I started with her makeup and then did the hair, she got dressed in the outfit prepared for her. I then packed all my make-up and hair kit and took the clothes and me and model one had to dive to the other models house because she finished work at 2pm and I needed to get on with the makeup straight away. We got to the second models house at 2.15pm as she had just got home and then I did her hair and makeup, this took me to 3.15pm however I was meant to meet my photographer at 3pm at Lydiard so we were behind schedule. We then arrived to Lydiard park at around 3.25pm and one of the models had to leave for 4.15pm so I had just under and hour to shoot. The sun kept appearing an disappearing and the air was bitter cold so the model were a bit cold as it wasn't the warmest day. We then found a good spot in front of trees and positioned the models, I brought the mood boards with me on the day so I could show them the look I was going for and the sort of look I wanted and how to position. After around 45 minutes of shooting it was a wrap and we had finished. All together I had just over 200 photos and the following day the photographer emailed them over to me.
Did any problems occur on the day or during the shoot?-
The first problem of the day was when I woke up and looked at the weather forecast it was saying it was going to rain all Saturday. I couldn't rearrange because my photographer works full time and both the other models work and go to college so its hard to get them all available at the same time. I woke up Saturday morning and the sky was completely grey and I was getting very worried, I started ringing around to find inside locations just in case it started to rain. Finally the De'vere hotel agree I could shoot in there lobby/lounge area as I have been there before and inside is beautiful.. I was so happy I had arranged a back up plan just in case. When my model got to mine at 12.30pm the sky started clearly up and the sun came out which made me so happy.. fingers crossed it wouldn't rain when we get there. My second problem was my time frame as my model finished work at 2pm however needed to leave by 4.15 so it gave me 2 hours to do her hair and makeup, dress, get to the location and shoot which was a challenge accepted and completed. When we arrived the sun would appear but dissappear and it was still cold outside so I felt bad for the models however shooting was only 45 minutes and then we jumped in the car and blasted the heating.
The first problem of the day was when I woke up and looked at the weather forecast it was saying it was going to rain all Saturday. I couldn't rearrange because my photographer works full time and both the other models work and go to college so its hard to get them all available at the same time. I woke up Saturday morning and the sky was completely grey and I was getting very worried, I started ringing around to find inside locations just in case it started to rain. Finally the De'vere hotel agree I could shoot in there lobby/lounge area as I have been there before and inside is beautiful.. I was so happy I had arranged a back up plan just in case. When my model got to mine at 12.30pm the sky started clearly up and the sun came out which made me so happy.. fingers crossed it wouldn't rain when we get there. My second problem was my time frame as my model finished work at 2pm however needed to leave by 4.15 so it gave me 2 hours to do her hair and makeup, dress, get to the location and shoot which was a challenge accepted and completed. When we arrived the sun would appear but dissappear and it was still cold outside so I felt bad for the models however shooting was only 45 minutes and then we jumped in the car and blasted the heating.
Am I happy with the overall look-
After the hardest shoot of my life and gathering together four us to collaborate and my crazy time frame I'm super happy with the look. I love both the looks and I adore both there outfits and feel they are 100% chanel inspired and couldn't be happier to say I styled this shoot. I was able to go on a big shopping spree and pick out outfits and possible looks to come to the conclusion of both Chanel spring/summer outfit. I took the colours used this year into consideration and I styled them in skirts and jackets creating that iconic look, I then layered the model with a cardigan and both bags like in the 2016 show. My theme and story was a summers walk in the woodlands in the South of France which reflects in my chosen location and inspired by the Cruise Editorial 2016. Looking at the images I am so proud of what I created and cant' believe soley put together the whole look, ideas, inspiration and making it look professional and Chanel spring/summer. I couldn't be happier with the positive outcome of the shoot after I thought all wasn't going to go to plan.
After the hardest shoot of my life and gathering together four us to collaborate and my crazy time frame I'm super happy with the look. I love both the looks and I adore both there outfits and feel they are 100% chanel inspired and couldn't be happier to say I styled this shoot. I was able to go on a big shopping spree and pick out outfits and possible looks to come to the conclusion of both Chanel spring/summer outfit. I took the colours used this year into consideration and I styled them in skirts and jackets creating that iconic look, I then layered the model with a cardigan and both bags like in the 2016 show. My theme and story was a summers walk in the woodlands in the South of France which reflects in my chosen location and inspired by the Cruise Editorial 2016. Looking at the images I am so proud of what I created and cant' believe soley put together the whole look, ideas, inspiration and making it look professional and Chanel spring/summer. I couldn't be happier with the positive outcome of the shoot after I thought all wasn't going to go to plan.
How do I feel about the images-
I think the images came I really good. I normally do the photography myself however because it's on location I decided to collaborate with a photographer to get the best images I can for the editorial. Before the shoot I sent her over the images I like and the mood board just so she got an idea of what I wanted created on the day and the look I was going for. I was spot on and I got a selection of 200 images to choose from and to finalise it to 2 final images for submission.
I think the images came I really good. I normally do the photography myself however because it's on location I decided to collaborate with a photographer to get the best images I can for the editorial. Before the shoot I sent her over the images I like and the mood board just so she got an idea of what I wanted created on the day and the look I was going for. I was spot on and I got a selection of 200 images to choose from and to finalise it to 2 final images for submission.
Am I going to re-shoot-
I am really happy with everything I have done including both make-up and hair designs, both dark haired tall model, my location and concept and overall how the images came out. I will not be needing to re-shoot as I'm pleased with the shoot and the outcome of the images.

I am really happy with everything I have done including both make-up and hair designs, both dark haired tall model, my location and concept and overall how the images came out. I will not be needing to re-shoot as I'm pleased with the shoot and the outcome of the images.

No comments:
Post a Comment