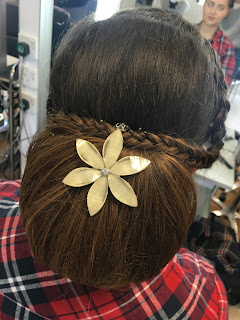
Firstly we were shows different photos of Chignons and what they look like and how you can style it. Lottie then gave us a demonstration on a Kate head of how to create it then allowing us to create our own version and style it how we want to and finally adding an accessory to the hair.
Equipment:
- Firstly I started with sectioning the hair so I knew what goes where. I firstly created a side parting with my pintail comb, and used a clip to keep them neatly aside. I then parted the fringe off from the back using the ear as a guideline of where to part on both sides of the head.
- I then got a hairband and used the brush to neatly put the hair in a mid pony tail. Once it was up in a pony tail I used my comb to back comb the pony tail to give it some volume. I then brushed over the top of the pony tail slightly to neaten it and I used my pin tail comb to fold the pony tail over and grip in to the head. I used a few grips to make sure it was nice and secure to the head.
- I then used my pin tail comb to spread out the bun to either side of the head. finally I used small thin grips to discreetly place them in the hair to secure each side of the chingnon.
- Next was the front of the hair, I took the left side out of the clip and started at the top of the section and started french plaiting down until the ear and finishing it off with plaiting until the end. I then took the plait and brought it round over the chignon and tucked the end into the hair and gripped it down.
- Finally was the other side of the hair to plait, which I took out the clip and started at the top of the hair and plaited down to the ear and carried on until the end of the hair. I then brought the hair over the chignon and tucked in the ends and gripped it in place so the ends are hidden.

Finally I added a large flower to the center of the hair, it was on a silver chain so I had to tuck the chain in the center under the plait for it to stay in place and hang in the center.
Final evaluation
Overall I was very pleased with the outcome of creating my first chignon. I think it was a very good size and shape, I think the hardest part was separating the chignon and gripping the sides down while making sure it was neat and didn't have large gaps in the hair. I used my comb to spread the hair out and evenly place it so I could grip it to the side of the hair. After creating the whole design and the plaits I realised the plait on the left side was a french plait and the one on the right side was dutch so they were slightly different on either side. When plaiting the hair I need to make sure I'm paying attention to what my hands are doing and the plait I am creating. Overall I think it came over very need and I was happy with the outcome for my first try.
Health and Safety:
- don't run in the studio
- keep works station neat and tidy
- keep bags and coats away
- be careful of any trailing cable or hot equipment


No comments:
Post a Comment