Contouring
Products:
- simple face moisturiser
- Laura Mercier Primer
- Collection Illuminating touch brightening concealer
- Nars concealer vanilla
- maybelline dream satin liquid 60. caramel
- Ben Nye banana powder
- Illamasqua duo sculpting powder and highlighter
- MAC highlighting pink nude powder
- Estee Lauder bronze goddess medium

- Firstly I applied primer all over the face, I then used brightening concealer under the eyes and on the lids.
- Next was concealing certain areas, I used it under the eye again, middle of the forehead, under the cheekbones, centre of nose and on the chin. I then used a dark foundation called dream satin liquid and contoured certain areas which were top of the forehead and sides, cheekbones, jaw line and chin and nose. Using my Real Technique blending brush I blending it all into the face working in circular motions and also down the neck.
- I set the look using the Ben Nye banana powder, I then used bronzer on the forehead, cheeks and neck to contour slightly. To contour further I used Illamasqua sculpting powder on the cheekbones to define them more. To give warmth to the cheeks I applied MAC nude pink powder on the apples of the cheeks.
- Finally I used a highlighter at the top of the cheekbones, down the nose, forehead, top lip and chin.


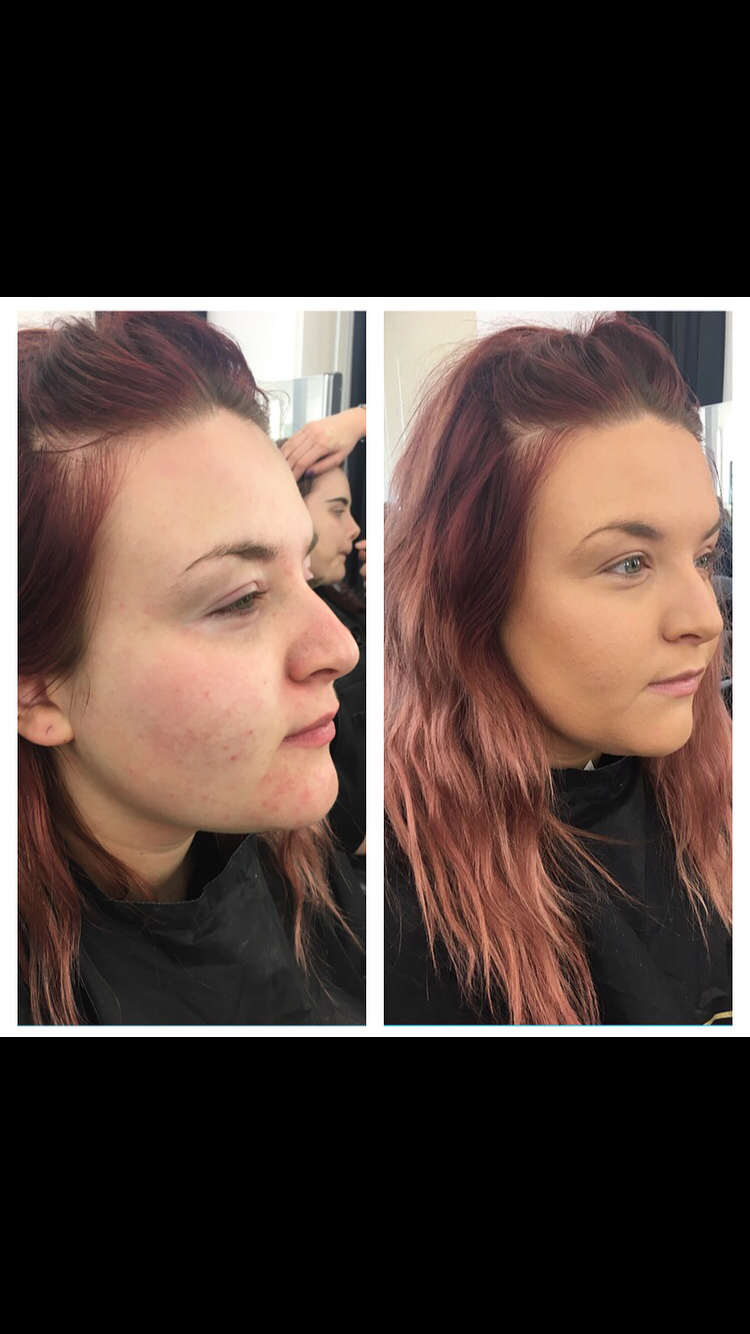
My model has a skin condition where she has quite prominent white patches around her eyes and she finds it very hard to conceal. I tried my best to conceal it and create a flawless finish to the skin with highlight and definition.
Evaluation
I think the overall finish of her skin looked really good and I was happy with the outcome. I think the hardest part was to conceal around the eyes however felt I succeeded with covering it. I think if I could do it again I might try and create more of a dewy contoured look with lots of highlighter as I went slightly more matte with this look. I think if I would improve on the look I would say I went a little too dark for her natural skin colour. When colouring I probably need to use more of the light shade than the dark otherwise the whole face can come out too dark for her natural skin colour. I think the skin does look glowing and flawless and I'm pleased with the outcome of my catwalk contour.
Contouring: an
outline representing or bounding the shape or form of something.
It is the edge or line that defines a
shape/object.
Sculpt: to form,
shape or manipulate or other shaping techniques
Correct: remove
the errors from
Highlight: a
bright or reflective area in a painting, picture or design
Why do
we contour: To bring colour and natural shadows
back to the face, to look better.
Products/textures:
Cream contouring:
If you don't want to achieve a complete
matte finish with all powder then use cream/wet products to contour,
illuminators, strobe liquid not contour powders.
(Experiment and add eyeliner and foundation
together to create a cream texture) - experiment with cream contouring using
foundation creams/liquids and concealers to do your base before adding further
depth and defined shape.
Powder contouring:
Powder/set a foundation base, before you add any
shape to the face using contour powders on top for any more sculpting so it
blends well and is smooth, rather than applying contour powders straight on to
a foundation base.
Think about the colour of the products you're
using:
Look at the light/darkness of the shade,
highlight a few shades lighter than the models skin match and to add depth and
shadow use a tone a couple of shades darker than the skin base.
How does it appear on the skin? Examine the
natural shade tone of the model and re create this tone. You can see the natural contour of the face - the jaw
outline for example.
Look closely into the undertones of a colour,
has it got yellows, pinks, greys in it (light, medium, dark tones). Look at
colour theory, get a colour wheel from an art store in your kit and understand
lightness and darkness - compared to the natural shadow tones of someone's
face.
Understanding the colour of natural shadows on
the face for different skin tones is important. Areas on the face will be
lighter than other darker areas/shadows - you will sometimes require more than
one light shade and one dark shade for highlighting and contouring to add this
depth and shade. Develop your contour images - start basic with natural
contouring, then add more depth and sculpture to the face. Know the purpose of
contouring you are setting out to achieve, how much do you want to shape and
outline the face? What's the purpose of the job? Editorial? Bride? Celebrity?
Tip: Contrast in photo
edit/Instagram/photoshop - notice in a portrait headshot the light parts get
much lighter and the shadows/hollows of the face get much darker. Understand
your face shape, look at these shadows and tones which shape the face.
Matte or Cream: Quality
of the product is important when contouring (smoothness, feel of the product,
the tone, the movement and colour difference. Compare these creams and powders
and see what you like to work with to contour and highlight.
Bronzers/Shimmer:
to add glow, tan, a sun kissed warmth, these can also be shimmery so don't use
bronzers as contour shading powders as shimmery products reflect light -
bringing it forward, not back.
Evaluate face shapes for contouring (not just
face features) examine jaw lines and hair lines - these create different
contour outlines of the face, cheek shapes/propionate or no cheekbone structure
- observing the bone structure/low or high cheekbones/shape of the bridge of
the nose/rounded, pointed or flat chin. Move the face to the side to see the
profile of the face, low or high cheekbones/jaw lines/nose shapes/chin shapes.
Look at the parts of the face that move forward (naturally catching the most light)
so you know where to contour.
No comments:
Post a Comment